
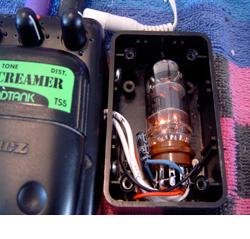

STEP 1: Make the Sidecar The tube is going to ride along side of the TS unit in a sidecar - this one is a small plastic box from Radio Shack. A metal box would have more shielding but also might short out the tube socket unless you really insulate it well. The tube is going to ride along side of the TS unit in a sidecar - this one is a small plastic box from Radio Shack. A metal box would have more shielding but also might short out the tube socket unless you really insulate it well.A hole on the sidecar will handle the wiring harness. I used 2 screws and some drilling to get the sidecar attached and the holes lined up for the wiring. NOTE - I originally had the idea to put the tube in the battery compartment shown opened here. However, there was not enough room for the socket. Perhaps a mini-tube would fit in here. Another project for the future? | |
STEP 2: Reassemble and route the Wiring  Reassemble the TS unit and get the PCB back in place. No matter what kind of TS unit you choose, these steps are the same. Reassemble the TS unit and get the PCB back in place. No matter what kind of TS unit you choose, these steps are the same.Route the two battery wires and the input/output wires you prepared before. | |
STEP 3: Wire the Tube  Now wire up the tube circuit. Cut the input and output shielded cables as short as possible. Connect the shields to pin 9, the common ground pin. Now wire up the tube circuit. Cut the input and output shielded cables as short as possible. Connect the shields to pin 9, the common ground pin. | |
STEP 4: Test  Now, connect the power supply and test the unit. NOTE: it will take 30 to 45 seconds for the tube to warm up. During this time, the output will be very quiet. Once the unit is warmed up, you should hear a nice tube sound. You might want to alter the tone control capacitor for more or less bass, or alter the three decoupling caps in the tube circuit as described in the Schematics & Theory section above. Now, connect the power supply and test the unit. NOTE: it will take 30 to 45 seconds for the tube to warm up. During this time, the output will be very quiet. Once the unit is warmed up, you should hear a nice tube sound. You might want to alter the tone control capacitor for more or less bass, or alter the three decoupling caps in the tube circuit as described in the Schematics & Theory section above. | |
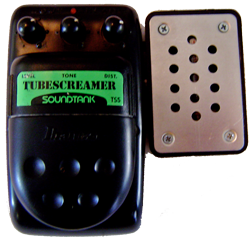
 Here's the final unit with the Sidecar faceplate installed. This was simply drilled out to accommodate proper ventilation. You need to provide some form of ventilation as the tube will get VERY HOT!


No comments:
Post a Comment